Posts tagged ‘recipes’

March 4, 2014

Shrimp Gumbo Casserole

by Crystal Cook

This Mardi Gras take a page from our latest book (page 44 to be exact) and celebrate with this gumbo inspired casserole! The Creole-spiced shrimp filling and satisfying biscuit topping will have your guests partying in the streets in no time!

shrimp gumbo

Shrimp Gumbo Casserole

Serves 8

3 tablespoons olive oil

1 onion, chopped

½ green bell pepper, chopped

3 celery rib with leaves, chopped

3 garlic cloves, minced

2 (28-ounce) cans diced tomatoes

1 (15-ounce) can tomato sauce

1 tablespoon plus 1/2 teaspoon salt

1 ¼ teaspoons freshly ground black pepper

1 teaspoon chili powder

1 teaspoon dried thyme

2 bay leaves

1 pound fresh okra, sliced

1 pound shrimp (31/35), peeled and deveined

2 teaspoons gumbo file

2 cups all-purpose flour

1 tablespoon baking powder

2 teaspoons sugar

1/2 teaspoon baking soda

5 1/2 tablespoons cold unsalted butter

3/4 cup buttermilk

  1. Preheat the oven to 450°F.
  2. In a large saucepan set over medium-high heat, heat the olive oil, then add the onion, green pepper, celery, and garlic. Cook, stirring, for 6 minutes until soft.  Add the tomatoes, tomato sauce, 1 tablespoon of the salt, pepper, chili powder, thyme, and bay leaves. Cover and cook slowly for 20 minutes. Add okra, shrimp and the gumbo file and cook for 3 to 5 minutes, until the shrimp turn pink.
  3. In a medium bowl, combine the flour, baking powder, cayenne pepper, sugar, baking soda, and the remaining 1/2 teaspoon salt.  Using a fork, cut in the butter until the mixture resembles coarse cornmeal. Stir in the buttermilk until the mixture just comes together. Knead until a soft dough forms.
  4. On a lightly floured surface, roll out the dough until it is 1/2 inch thick.  Using a 2 1/2 inch round cutter, stamp out 12 biscuits.
  5. Pour the hot gumbo into a 9 x 13 inch casserole dish. Arrange the biscuits on top of the gumbo. Bake until the biscuits are golden brown, about 20 minutes.
December 18, 2013

Mamaw’s Stuffed Peppers

by Crystal Cook

I always miss my Mamaw Cook, but the holidays make me miss her even more. Lately, I haven’t been able to get her off my mind, so I wrapped myself up in this Christmas apron she made for me and got to cooking! It never ceases to amaze me how the smell of these stuffed peppers can instantly transport me back in time to the comfort of her kitchen.  Smells are magical like that. Happy holidays Mamaw,  I miss you so much!

mamaw Collage

Mamaw’s Stuffed Peppers

Serves 6

Ingredients

  • 6 green bell peppers
  • 1 pound ground beef
  • 1 large onion, finely chopped
  • 2 garlic cloves, minced
  • 1 tsp. salt
  • 1/4 tsp. freshly ground black pepper
  • 2 (14 3/4-ounce) cans diced tomatoes
  • 1 tsp. Worcestershire sauce
  • ½ tsp. ground allspice
  • 1 cup cooked long-grain white rice
  • Cooking spray
  • 1 Tbsp. unsalted butter
  • 1/2 cup seasoned bread crumbs
  • 4 cups tomato sauce( recipe below)

Directions

1. Preheat the oven to 350°F.

2. Make the tomato sauce. (Recipe below)

3. Cut off the top of each bell pepper and remove the seeds. Put the peppers in a large pot of boiling salted water and cook for 5 minutes. Drain well and set aside.

4. Set a skillet over medium heat. Add the beef, onion, and garlic, and season with salt and pepper. Cook, breaking up any lumps with the back of a spoon, until the beef is browned thoroughly, about 10 minutes. Add the tomatoes and simmer for 10 minutes. Add the Worcestershire sauce, allspice, and rice; stir well.

5. Coat a 9 x 13-inch casserole dish with cooking spray. Stuff the peppers with beef mixture and place them in the prepared casserole dish. Pour tomato sauce over the peppers.

6.  In a small saucepan, melt the butter. Remove the pan from the heat and stir in the bread crumbs. Scatter the bread crumbs over the peppers and place the dish in the oven. Bake for 25 minutes or until the bread crumbs are golden brown and the meat is heated thoroughly.

Tomato Sauce

Makes 4 cups

Ingredients

  • 2 tablespoons unsalted butter
  • 1 medium onion, diced
  • 3 cups diced canned tomatoes
  • ½ cup finely minced celery
  • 1 ½ tablespoon white wine vinegar
  • 2 teaspoon minced parsley
  • 1 teaspoon sugar
  • 1 ½ teaspoon salt
  • ½ teaspoon freshly black ground pepper

 Directions

1. In a sauce pan set over low heat, melt the butter.

2. Add the onion and sauté for about 5 minutes or until tender.

3. Add the tomatoes, celery, vinegar, parsley, sugar, salt, and pepper and cook about 10 minutes.

4. Pour the sauce over the peppers before baking.

Kitchen Tip:

Keep your stuffed peppers upright in the oven! When you remove the pepper tops, put them between the stuffed peppers for extra stability. (Yep, my Mamaw taught me that!)


November 8, 2013

Granny Pansy’s Baked Apples

by Sandy Pollock

Baked Apples a la Granny Pansy

Granny Pansy, there will only ever be one like her. She was sassy and confident and took nothing from no one, and just happens to have some super amazing granddaughters :)!

SCN_0001(My uncle Keith, Granny Pansy, my adorable Dad!)

She made this dish a lot, but when I think of this dish I go back to a very specific memory with Granny. Once a year, just before Christmas, she would have us (me and my sisters) over to the house and we would spend the day making Christmas crafts and eating baked apples. We glittered and glued and painted and ate until we could do no more. It was at this point that she would send the four of us back home covered in glue, sparkles, and brown sugar!  It was awesome and a time I will always and forever cherish. Will still adorn the family tree with some of the crafty decorations we made with Granny Pansy back then.

IMG_8404

½ cup sugar
1 cup water
6 apples
1/3 cup brown sugar
3 tablespoons butter
1 teaspoon cinnamon

IMG_8407Preheat oven to 375F

In a saucepan over medium heat combine 1/2 cup of sugar with 1 cup of water. Heat until sugar dissolves.

Pour this syrup in the bottom of a 9 x 13 inch casserole dish.

IMG_8411Core the apple, but don’t go all the way through to the bottom. (This will help keep sugar filling in the apple.)

IMG_8413In a medium bowl, mix the brown sugar, butter, and cinnamon thoroughly.

IMG_8416 Divide the mixture equally between the 6 apples. Place filled apples in the casserole dish.

IMG_8424Cook for 45 minutes to an hour, or until a knife can be easily inserted into the apple. Let cool for 5 minutes.

IMG_8440Serve with vanilla ice cream.

Baked Apples a la Granny Pansy

Serves 6

½ cup sugar
1 cup water
6 apples
1/3 cup brown sugar
3 tablespoons butter
1 teaspoon cinnamon

Preheat oven to 375

In a saucepan over medium heat combine 1/2 cup of sugar with 1 cup of water. Heat until sugar dissolves. Pour this syrup in the bottom of a 9 x 13-inch casserole dish.

Core the apple, but don’t go all the way through to the bottom. (This will help keep sugar filling in the apple.) In a medium bowl, mix the brown sugar, butter, and cinnamon thoroughly. Divide the mixture equally between the 6 apples. Place filled apples in the casserole dish.

Cook for 45 minutes to an hour, or until a knife can be easily inserted into the apple. Let cool for 5 minutes. Serve with vanilla ice cream.

November 6, 2013

The Great Cannoli Casserole Challenge!

by Crystal Cook

The Casserole Queens were recently in the Kansas City area to present at the 2013 Hen House Market Holiday Celebration! We are big fans of the Hen House Market and all the terrific folks of Kansas. Everyone is always so welcoming and they truly makes us feel like royalty.

In preparation for the event, our dear friend Jasper Mirabile, the owner and proprietor of  Jasper’s in Kansas City AND one of the nicest guys you’ll meet, had us on his weekly podcast. It was just on the heels of National Cannoli Month and Jasper was still on a cannoli high! During the entire month of September, Jasper was on a mission to spread his love of the cannoli by hosting events at his restaurant, going on local TV and radio shows, as well as holding a cannoli recipe contest for his guests. The grand prize you ask? Well, cannoli’s for a year of course! Oh, and did we mention that Jasper’s also displays the world’s most expensive cannoli, designed by cake designer Cary Iennaccaro? It’s true, and the value is over $26,000. It features an antique diamond necklace from Tom Tivol Jewelers. Now that is one dazzling cannoli!

So naturally,  it comes to no surprise that while we were on the show, Jasper challenged us to create a Cannoli Casserole! We were nervous about creating a cannoli casserole for a man who loves the cannoli so, but we accepted the challenge and think he will be proud of the end result.

We walked into the challenge knowing that we needed to capture all the flavors of the classic cannoli, but still work within our beloved 9 x 13 inch casserole dish. We made certain to have all the traditional ingredients present and accounted for, but also switch it up a bit (as we like to do) to make this version our own. You’ll see that we replaced the crunchy cannoli outer shell with a scrumptious chocolate chip cookie base, infused with traditional cannoli flavors of orange, chocolate, and ricotta cheese. Then, we perfected our casserole-friendly cannoli by adding a sweetened ricotta cheese mixture on top, with toasted almonds and Maraschino cherries – super tasty and easy to whip up!

Challenge complete.

Enjoy!

Intro

cookie bar

Final

CQ Cannoli Bars

  • 4 cups all-purpose flour
  • 1 teaspoon baking soda
  • 1 teaspoon salt
  • 1 cup (2 sticks) unsalted butter, softened at room temperature
  • 1/2 cup whole-milk ricotta, at room temperature
  • 2 cups granulated sugar
  • 2 teaspoons finely grated orange zest
  • 2 teaspoons pure vanilla extract
  • 2 large eggs, at room temperature
  • 1 1/2 cups chocolate chips
  • 1 recipe Cannoli Cream (see recipe below)
  • 5 maraschino cherries (more if you love’em)
  • ½ cup sliced almonds, toasted
  1. Preheat oven to 325 degrees F.  Spray a 9×13-inch baking pan with nonstick cooking spray and set aside.
  2. In a medium bowl, whisk together flour, baking soda, and salt. Set aside.
  3. In the bowl of a stand mixer, beat the butter and ricotta on medium-high speed until light and fluffy, about 2 minutes. Add the sugar, orange zest, and vanilla; beat until blended, about 2 minutes. Scrape down the sides of the bowl. On medium speed, add the egg and beat until blended. On low speed, add the flour until mixture comes together. Pour in the chocolate chips and continue mixing until just incorporated.
  4. Pour cookie dough into the prepared pan, smoothing the top with the spatula
  5. Bake cookie bars for 45 minutes or until the top of the bars are light golden brown and the edges start to pull away from the pan
  6. Allow bars to cool completely
  7. Frost the top of the cookie bars with the cannoli cream (recipe follows)
  8. Top with cherries and toasted almonds 

CQ Cannoli Cream

  • 3 cups whole-milk ricotta cheese
  • 1 cup confectioners’ sugar
  • 1 tablespoon orange zest
  • 2 ounces chocolate chips
  1. In a large bowl, whisk together the ricotta cheese, confectioners’ sugar, and orange zest – until smooth.
  2. Stir in chocolate chips until incorporated evenly into cream

jasper

JASPER J. MIRABILE JR.

Chef Jasper J. Mirabile Jr. of Jasper’s commands the helm of his family’s 59-year-old restaurant, consistently rated one of Kansas City’s best Italian restaurants. In addition to running the restaurant with his brother, Mirabile is a culinary instructor, founding member of Slow Food Kansas City and a national board member of the American Institute of Wine and Food. He hosts many famous chefs on his weekly radio show Live! From Jasper’s Kitchen on KCMO 710 AM and 103.7 FM, authored two cookbooks and sells a line of dressings and sauces.

October 24, 2013

Pumpkin, Butternut Squash and Sage Soup

by Crystal Cook

pumpkin shot final

There is something magical that happens in the fall: pumpkin-flavored foods are suddenly everywhere you turn. There are pumpkin spiced lattes, pumpkin breads, pumpkin beer, and hold on…there are even pumpkin flavored pop tarts!  To all of those things, I say: yes please! I love fall for this pumpkin flavor explosion, so I decided that I wanted to cook something that celebrates the pumpkin in all its natural glory. Behold the glorious Pumpkin, Butternut Squash and Sage Soup, served in a pumpkin bowl of course!

Typical me, I always seem to make things a lot harder than they need to be, so just know that this soup is delicious even without all the bells and whistles (but hello! sage oil and homemade crème fraîche) so it is up to you how crazy you want to get (that goes for the pumpkin bowls too)! But if you want to go all out (and trust me it is worth it!) then know there is some prep involved.

As seen in the previous two posts, the first thing I did was make my crème fraîche and sage oil the day before. This garnish is optional, and you can always buy the prepared product at the store if you don’t want to make it from scratch. I promise I won’t tell.

Now onto pulling out all my soup ingredients! Pie pumpkin, butternut squash, olive oil, vegetable oil, unsalted butter, onions, fresh sage, shallots, garlic, chicken broth, Salt and freshly ground black pepper. Are you hungry yet? You should be.

Ingredient shot

Cut pumpkin in half to seed pumpkin, then cut each half in half again (so your pumpkin is now quartered). Rub flesh with olive oil, salt and pepper. Peel butternut squash and cut in half to remove seeds. Cube squash into about 1-2 inch pieces, toss pieces in olive oil and salt and pepper. Bake each on a baking sheet lined with foil for 30 minutes. Set aside to cool.

roasting veggie Collage

Melt 6 tbsp. of the butter in a heavy stockpot over medium heat. Cook onions, garlic and 1 cup of the shallots in butter until translucent about 15-20 minutes. Meanwhile, scrape flesh from pumpkin (I used a melon scoop to do this) and add to the onion mixture. Also add the butternut squash. Cook for about 5 minutes.

saute onion garlic shallots Collage

Add 6 cups chicken stock, 1 tablespoon chopped sage and salt to taste. Bring mixture to a boil and then simmer for 30 minutes.

squash broth sage salt Collage

If you decided to make pumpkin bowls, here is how I did it, but remember this step is completely optional (but completely adorable). When the soup is simmering, it is a perfect time to get these made! I chose a few smaller pie pumpkins than the size of what we use in the soup recipe – they were more around 2-1/2 lbs instead of 5. I guess you could do 5 pound pumpkins, but you had better be really hungry! All you have to do is cut off the tops of the pumpkin or cut a large circle around the stem of each pumpkin. Remove the lid and scoop out the seeds and fibers. I then coated the inside flesh and outside of the pumpkin with olive oil and then seasoned with salt and pepper. Place the pumpkins and lids on a baking sheet cover with foil and roast in a 350 degree oven for about 35 minutes.

bowl Collage

Using a large measuring cup take batches of soup and purée soup in a blender or food processor until smooth, then return to pot. Repeat as necessary. It is ok to have some chunky pieces. I actually enjoy that texture in the soup!

Puree Collage

Take the remaining ¼ cup of shallots and the 20 sage leaves and fry in 1 cup vegetable oil until crisp (you will see the shallots turn a nice golden color). Drain on paper towels.

fry sage and shallots

Now that your soup is done, let the garnish games begin.  I promise each one counts! First drizzle on some of the sage oil. Just look how lovely that green color is! The drizzle with crème fraîche, and finish with the crispy shallots and 2-3 sage leaves.

Garnish Collage

Now celebrate fall with your loved ones!

Final pumpkin 2

Pumpkin Bowls: (See method in post)

4 or how ever many small baking pie pumpkins you want to make – up to 2.5 pounds each
Olive Oil
Kosher salt & Cracked black pepper

 
Pumpkin, Butternut Squash and Sage Soup

Serves 8

1 small (about 5 lbs.) pie pumpkin, cut in half then quartered
1 medium butternut squash, peeled, seeds removed, cubed
4 -5 tbsp. olive oil for roasting pumpkins and squash
6 tbsp. unsalted butter
2 medium onions, finely chopped
1 tablespoon fresh sage leaves, chopped + 20 sage leaves for garnish
1 1/4 cups diced shallots, divided
3 cloves garlic, peeled and minced
6 cups chicken broth
Salt and freshly ground black pepper
1 cup vegetable oil
Sage Oil for Garnish (optional)
Crème fraîche for Garnish (optional)

  1. Preheat oven to 350°.
  2. Cut pumpkin in half to seed pumpkin, then quarter. Rub flesh with olive oil, salt and pepper. Peel butternut squash and cut in half to remove seeds. Cube squash into 1-inch pieces, toss pieces in olive oil and salt and pepper. Bake each on a baking sheet lined with foil for 30 minutes. Set aside to cool.
  3. Melt 6 tbsp. of the butter in a heavy stockpot over medium heat. Cook onions, garlic and 1 cup of the shallots in butter until translucent, about 15-20 minutes. Meanwhile, scrape flesh from pumpkin (I used a melon scoop) and add to the onion mixture. Also add butternut squash. Cook for about 5 minutes.
  4. Add 6 cups chicken stock, 1 tablespoon chopped sage and salt to taste. Bring mixture to a boil and then simmer for 30 minutes.
  5. Using a large measuring cup take batches of soup and purée in a blender or food processor until smooth, then return to pot. Repeat as necessary. It is ok to have some chunky pieces – I actually enjoy that texture in the soup!
  6. Take the remaining ¼ cup of shallots and the 20 sage leaves and fry in 1 cup vegetable oil until crisp. Drain on paper towels, then garnish each serving starting with sage oilcrème fraîche and then the crispy shallots and 2-3 sage leaves.
October 23, 2013

Make Your Garnish Count!

by Crystal Cook

Yesterday we started the prep for garnishes for our upcoming Pumpkin, Butternut Squash and Sage Soup post with learning how to prep crème fraîche, and as promised, today we will make a sage infused olive oil. (Remember folks, baby steps!) And don’t think I don’t know what y’all are thinking! You are thinking I MAY have gone overboard with the garnishes, but I truly believe every single one of the garnishes used in the soup recipe count! In fact, a garnish should always count. If it does not enhance the flavor of the dish, then simply don’t bother.  I am also a big fan of making sure that if I am creating a garnish from scratch, that I have plenty of ideas on how to use any leftover product. I hate to waste anything, so like with the crème fraîche, ideas for additional use are at the end of the post. Besides, when it is this good – you will find lots of ways to incorporate it!

Now let’s get back to the sage olive oil and the heart of this post.  Just think about it…a simple drizzle of good quality olive oil is both delicious and elegant, add a gorgeous herb like fresh sage – and you have magic! With that said, be sure to spring for a good quality olive oil for this recipe. It only has a few simple ingredients, is really easy to prepare and just requires a little forethought.

sage oil ingredients final

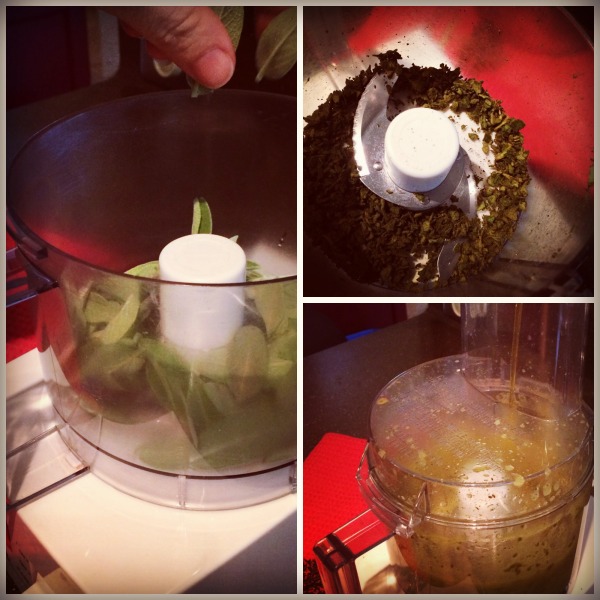
With that said, the first thing is to take a cup of good quality EVOO and place it in the fridge to chill for 1 hour. (That’s all the forethought you need folks!)  Once chilled, take about a cup of fresh sage leaves (leaves only) and place them in the bowl of a food processor. Pulse the leaves until they are very fine and coarse. With the motor running, slowly drizzle in the chilled olive oil.

Sage Oil Collage

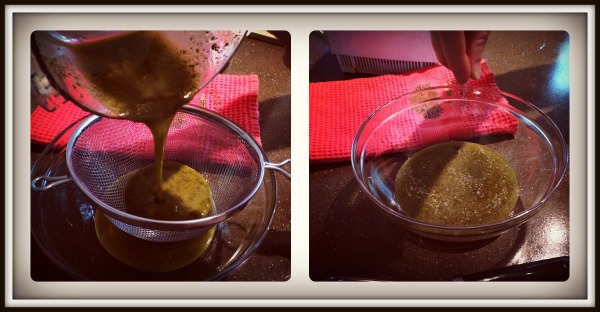
When all of the olive oil has been incorporated and the mixture is a bright green color throughout, pass through a fine sieve and discard the solids. Finish off by seasoning with kosher salt to taste.

discard and salt

Store the olive oil in an airtight container of your choice and keep in the fridge for up to 3-5 days. We purposely made this in a small batch so that you can easily find uses for it. Aside from garnishing our pumpkin, butternut squash and sage soup, here are some other ways I love using this:

  • Drizzle this over your favorite mushroom pizza to make it sing! Bada Bing!
  • Dress up your favorite cheese or pumpkin ravioli by tossing it in this flavorful oil along with some shaved Parmesan cheese. And guess what? You can do the same with risotto!
  • Goes great on earthy creamed soups such as a cream of mushroom, butternut squash or potato leek soup.
  • Simply splash on roasted root vegetables to pick up a subtle hint of sage.
  • Rub it onto chicken or turkey breasts before cooking, and it will taste like Thanksgiving!

Note: The refrigeration will cause the oil to become a bit cloudy and slightly solid. It will return to its liquid state once removed from the refrigerator and placed on the counter for a few minutes. Give it a quick whisk before use.

October 22, 2013

Crème Fraîche: The Fancy French Cousin.

by Crystal Cook

I used this crème fraîche as a garnish for a Pumpkin, Butternut Squash and Sage soup that I made this weekend. Originally I was going to incorporate the method into the soup post, but since I also garnished with some olive oil that I infused with sage, I thought it might be nice to teach you how to make these separately. That way you can go ahead and make them to have on hand!  Besides, if I put all of that in one blog post it would become more like a small novel. You know I couldn’t just stop there! I also had to make some crispy sage leaves and shallots, then I served the entire darn thing in a pumpkin bowl! It was amazing, but it took some time! So, since the crème fraîche can be stored for up to 10 days, let’s start here — and then tomorrow we can tackle the sage oil — and then head on to the soup in a pumpkin bowl! Baby steps….

So what is crème fraîche, you ask? Well, crème fraiche is sour cream’s thinner, more sophisticated cousin from France. Aside from the accent, it also has a smoother taste and won’t break as sour cream does when added to sauces. (Show off!) While crème fraîche is becoming more and more available in supermarkets, it is actually really easy to make at home. The only thing sour cream has going for her is that crème fraîche doesn’t develop in a hurry. Crème fraîche will make you wait. 24 hours to be exact.

Cream Collage

It only takes 3 simple steps to make — the waiting is the hardest part! Simply pour 1 cup heavy cream in a jar, add 1 tablespoon buttermilk, cover and shake. Leave covered at room temperature, stored in a dry place and away from sunlight, for 24 hours. It is ready when it becomes thick, and don’t worry about the cream spoiling; the benign live bacteria in the buttermilk will multiply and protect the cream from harmful bacteria. You know, science stuff. After 24 hours, place in the refrigerator. It will continue to thicken and take on a tangier flavor as it ages. Crème fraîche will keep in the refrigerator for up to 7–10 days.

In closing, here is a teaser shot of the crème fraîche on my soup. Oh, and some other clever uses for it! It really is pretty amazing on about anything.

  • Great on black bean and other creamed veggie soups, too!
  • Mix into mac and cheese for something completely decadent.
  • Stir into marinara to make for a creamier pasta sauce.
  • Spoon it in place of whipped cream over chocolate pudding, or on top of your favorite cobbler.
  • Make an elegant appetizer by dolloping it onto smoked salmon and rye bread, topped with fresh dill.
  • Make your morning brighter by serving alongside your morning scone.

Final pumpkin 2

September 30, 2013

Merry Mushroom Bread Pudding

by Crystal Cook

My dish addiction is no secret. We have discussed it here on the blog many times before. So it should come as no surprise that I have an impressive selection of vintage casserole dishes—from Pyrex to Fire King, and a whole lot of everything in between. One of my favorites happens to be a Corning Ware dish with the “Merry Mushroom” pattern on it. The orange, yellow, and brown color palette screams 70’s, and I love it! The dish keeps me inspired and I am constantly creating new mushroom recipes to proudly serve up in this dish. Trust me, nothing perks up a buffet table like a “Merry Mushroom” painted casserole pan!

Since I just learned that September was National Mushroom Month, I jumped at the chance to make something in this dish! Unfortunately I didn’t find out about this until the next to the last day of the month, so I had to act fast! I picked up my trusty Make-A -Meal cookbook from The Cassserole Queens (maybe you have heard of it?) and immediately turned to the Merry Mushroom bread pudding—one of the finest mushroom masterpieces around! The combination of portobello and button mushrooms makes it especially earthy and super comforting.

Shall we?

casserole_cvr_resize

Ingredient list

Yummy ingredients: Milk, rustic bread, portobello mushrooms, vegetable oil,  button mushrooms, garlic,  fresh parsley,  fresh rosemary, salt, freshly ground black pepper, eggs, and Gruyère cheese.

Pour milk

First take your bread and cube it into 2-inch pieces. Any rustic bread will do, but I used Ciabatta and I liked it a lotta! 🙂 Pour 2 cups of milk over the bread and refrigerate for 30 minutes – stirring occasionally. 

Meanwhile, using a spoon, remove the brown gills from the undersides of the portobellos and remove the stems; discard the gills and stems, slice mushrooms. Heat the oil in a large nonstick skillet set over medium-high heat. Add the portobello and button mushrooms and sauté for 4 minutes, until the mushrooms start to release their juices.

mushrooms saute

Stir in the garlic, parsley, rosemary, salt, and pepper, and cook for 1 minute.

add garlic rosemary and parsley

In a medium bowl, whisk together the remaining 1 cup of milk, the eggs, and the egg white.

whisk eggs

Spoon 2 cups of the bread mixture from the fridge into the prepared casserole dish.

layer

Top with the mushroom mixture.

layer mushroom

Sprinkle with ⅓ cup of the cheese.

cheese layer

Top with the remaining bread mixture and the remaining ⅔ cup cheese. Pour the egg mixture over top.

last layer

bread pour

Bake for 45 minutes, or until set. Let cool 5 minutes before serving.

in the oven

final mushroom dish

final from above

Gorgeous and delicious! Happy National Mushroom Month (or in this case – day!) Better late than never, right?

Merry Mushroom Bread Pudding.

Serves 6

Cooking spray

3 cups whole milk

8 cups rustic bread, cut into 2-inch cubes (I used Ciabatta)

2 (4-ounce) portobello mushrooms

2 teaspoons vegetable oil

6 cups quartered button mushrooms (about 12 ounces)

2 garlic clove, minced

½ cup chopped fresh parsley

2 teaspoons chopped fresh rosemary

¼ teaspoon salt

¼ teaspoon freshly ground black pepper

3 large eggs

1 large egg white

1 cup shredded Gruyère cheese (4 ounces)

1.  Preheat the oven to 375°F. Spray a 9 × 13-inch casserole dish with cooking spray.

2.  In a medium bowl, combine 2 cups of the milk and the bread. Cover and chill for 30 minutes, stirring occasionally.

3.  Meanwhile, using a spoon, remove the brown gills from the undersides of the portobellos and remove the stems; discard the gills and stems, slice mushrooms. Heat the oil in a large nonstick skillet set over medium-high heat. Add the portobello and button mushrooms and sauté for 4 minutes, until the mushrooms start to release their juices. Stir in the garlic, parsley, rosemary, salt, and pepper, and cook for 1 minute.

4.  In a medium bowl, whisk together the remaining 1 cup of milk, the eggs, and the egg white. Spoon 2 cups of the bread mixture into the prepared casserole dish. Top with the mushroom mixture and sprinkle with ⅓ cup of the cheese. Top with the remaining bread mixture and the remaining ⅔ cup cheese. Pour the egg mixture over top. Bake for 45 minutes, or until set. Let cool 5 minutes before serving.

September 18, 2013

For the Love of Ramekins: Pot de Crème

by Crystal Cook

Have I ever told y’all about my deep affection for ramekins? If not, you’re about to find out.

Ahh ramekins…the oh-so-versatile dish that is a must in any kitchen. Perfect for individual sized meals and desserts, ramekins also have a number of other uses. In fact, ramekins help you organize recipe ingredients so that you‘re ready to go once the oven is fired up (professional chefs refer to this practice as mise en place). You can also use them for condiments at the dinner table like dipping sauces, toppings, or fresh sea salt or cracked black pepper. (Yes, I am in love!) I am constantly finding ways to use them since my friends and family tease me about the sheer amount of ramekins that I own. I admit, it may be excessive, but you never know when a gal might just want to whip up some Pot de Creme! Am I right?!

Which brings me to this tasty post. Pot de Creme is one of those crazy simple recipes with an end result that feels so indulgent. It takes less than 10 minutes to whip up, and requires only 5 simple ingredients. The only potential drawback you could possibly find is that it takes time to set in the refrigerator (about 2 hours). But I don’t even find that to be a negative, since I love things that you can prepare before hand. You can’t be a “hostess with the mostess” when you’re all stressed out. I like having more time with my company to do the things I want, like enjoy a glass of wine!

So let me show you how easy this really is!

5 simple ingredients: Milk, Vanilla Bean, Egg, Sugar & Dark Chocolate.

photo 2

Cut the bean lengthwise and scrap out the good stuff!

photo 3

Pure heaven!

photo 4

Add milk and vanilla bean to a saucepot and scald. To do this heat over med-high heat and remove pot from heat right before milk comes to a boil or reaches 180F.

photo 5

photo 6

photo 7

Place the remaining ingredients in a blender.

photo 8

Pour milk into a blender along with the sugar, chips, and egg. Blend for 1 minute.

photo 9

photo 10

Pour into 6 ramekins and chill for 2 hours in the refrigerator or until set.

photo 11

Garnish with favorite toppings. We used our caramel sauce, berries and powdered sugar – but we have even more suggestions in the recipe below!

photo 12

Voila!

Pot de Crème

3/4 cups milk

1/2 vanilla bean, split and scraped lengthwise

2 tablespoons sugar

1 cup chocolate chips

1 egg

6 (3-4 ounce) ramekins

Garnish suggestions: powdered sugar, caramel sauce, berries, mini marshmallows, chocolate covered espresso beans, cocoa powder, shaved chocolate.

Method:

1. Add milk and vanilla bean to a saucepot and scald. To do this heat over med-high heat and remove pot from heat right before milk comes to a boil or reaches 180F.

2. Pour milk into a blender along with the sugar, chips, and egg. Blend for 1 minute and pour into ramekins, chill for 2 hours in the refrigerator or until set. Garnish with favorite toppings.

April 11, 2013

Daddy’s Dumplings

by Crystal Cook

People are continually asking us all kinds of food-related questions and we never tire of answering them because, well, we just really love food. Things like, “What is your favorite casserole?” or “Can you make a cookbook where the main ingredients of every dish are butter and sugar?” or “Do you dress up as 50’s housewives when you’re alone at home doing your taxes?” But the one that always tends to stump me is “What would you want your last meal to be?” The problem I always have with that question is it depends on who is making the food. For example, Chicken and Dumplings is my favorite meal in the world, but if and only if my Daddy is making them. No prison cook is going to know how to make them taste the way he does– unless perhaps they learned a thing or two from Martha while she was in the joint. Yes, everyone, that’s the second Martha-Stewart-In-Prison reference I’ve made in less than a month. What can I say, locked up or on the streets, the woman gets to me.

Now back to the dumplings—there are just certain things my Daddy does to make them special. Unlike when he makes biscuits, he substitutes the buttermilk in dumplings for whole milk. Why? Using buttermilk can make dumplings too fluffy/doughy. You’re welcome, frustrated Dumpling Artisans of America! Now I will admit, most of the time my Daddy cooks with dried herbs, but he always opts for fresh thyme and rosemary for the dumplings. He adds a little bacon grease from his can by the stove to the mix, as well (yes, my parents still collect bacon grease! We are authentically southern, lest you forget!)

But, let’s say hypothetically I get thrown in the slammer for somethin’ I swear I didn’t do, Judge! And let’s say hypothetically that you were the prison cook and there were regulations against having my father enter the prison kitchen and cook them for me one last time. Here’s how you do it:

Chicken and stock ingredients

Ingredients for the Chicken.

chicken collage

Combine broth, water, chicken, thyme and rosemary sprigs in a large Dutch oven over medium-high heat; bring to a boil. Reduce heat, and simmer, uncovered, 15 minutes or until chicken is done and no longer pink. Remove pan from heat.

strain collage

Strain broth through a sieve into a large bowl; discard solids and set liquid aside. Remove chicken from bones and shred chicken.  Set chicken aside.

celery garlic carrots and onion

veggie collage

Heat oil in the same Dutch oven over medium-high heat. Add carrots, celery, onion, and garlic; sauté 6 minutes or until onion is tender.

add reserved broth and herbs to veggies

Add reserved broth mixture and 1 teaspoon salt, 1 teaspoon pepper, 1 tablespoon chopped thyme and 1 tablespoon rosemary; simmer 10 minutes.  Keep warm.

dumpling ingredients

While the broth simmers…it is time to make the dumplings! Grab your ingredients!

herbs to flour

Combine flour and rosemary in a bowl.

flour collage

Cut in shortening and bacon drippings with a pastry blender until mixture is crumbly.

milk collage

Add milk, stirring until dry ingredients are moistened.

knead collage

Turn dough out onto a lightly floured surface. Roll out to 1/8-inch thickness; cut into 1-inch pieces.

dumpling collage

Roll out to 1/8-inch thickness; cut into 1-inch pieces.

add chicken and dumplings to pan collage

Return chopped chicken to the broth mixture; bring to a simmer over medium-high heat. Bring broth mixture to a boil. Drop dumplings, a few at a time, into boiling broth, stirring gently. Reduce heat, cover, and simmer, stirring often, for 25 minutes. Add additional salt and black pepper to taste.  Fold and serve and garnish with fresh parsley.

Finished product

I can leave this world happy now!

How about you? What would be your last meal?

Daddy’s Dumplings:

Approximately 8-10 servings

Chicken:

6 cups chicken broth
2 ½ cups water
1 pound chicken drumsticks, skinned
1 pound skinless, boneless chicken breast halves
2 thyme sprigs, plus an additional one tablespoon chopped
2 rosemary sprigs, plus an additional one tablespoons chopped
1 tablespoon olive oil
1 1/2 cups carrots, diced
1 1/2 cups celery, chopped
1 cup yellow onion, diced
4 garlic cloves, minced
½ teaspoon garlic powder
1 teaspoon kosher salt, plus more to taste
1 teaspoon freshly ground pepper, plus more to taste
Chopped flat leaf parsley for garnish

Dumplings:

3 cups self-rising flour
1 tablespoon chopped rosemary
1/3 cup shortening
2 teaspoon reserved bacon fat/drippings
1 cup whole milk

Combine broth, water, chicken, thyme and rosemary sprigs in a large Dutch oven over medium-high heat; bring to a boil. Reduce heat, and simmer, uncovered, 15 minutes or until chicken is done and no longer pink. Remove pan from heat.  Strain broth through a sieve into a large bowl; discard solids and set liquid aside. Remove chicken from bones and shred chicken.  Set chicken aside. Heat oil in the same Dutch oven over medium-high heat. Add carrots, celery, onion, and garlic; sauté 6 minutes or until onion is tender. Add reserved broth mixture and 1 teaspoon salt, 1 teaspoon pepper, 1 tablespoon chopped thyme and 1 tablespoon chopped rosemary; simmer 10 minutes.  Keep warm.

While broth is simmering, prepare dumplings. Combine flour and rosemary in a bowl. Cut in shortening and bacon fat with a pastry blender until mixture is crumbly. Add milk, stirring until dry ingredients are moistened.  Turn dough out onto a lightly floured surface. Roll out to 1/8-inch thickness; cut into 1-inch pieces.

Return chopped chicken to the broth mixture; bring to a simmer over medium-high heat. Bring broth mixture to a boil. Drop dumplings, a few at a time, into boiling broth, stirring gently. Reduce heat, cover, and simmer, stirring often, for 25 minutes. Add additional salt and black pepper to taste.  Fold and serve. Garnish with fresh parsley.